
PixiJS
This is my first look into PixiJS, I am quite excited about jumping right into this. One of my favourite game frameworks relies on using PixiJS for rendering and if you haven't already, check it out at http://phaser.io/
Goals of this Tutorial
For this first section of my PixiJS getting started guide I plan on just setting up the project with the required libraries and getting an image to render on the screen.
Setup Development Environment
Firstly, we need to setup our development environment for running our Pixi Project which can be done in a number of different ways. Personally I have decided to set this up using NodeJS and an NPM package called serve. This is really easy to use and involves a small amount of setup.
You can also use tools like MAMP, AMMPS or XAMPP to name just a few which are various Apache stacks and involve a little setup for hosts.A lot of this is beyond the scope of this tutorial but feel free to leave a comment below if you would like me to cover some of these in a separate post. I would however try to suggest using a tool which is a little more simple. The above tools are full stacks for storing databases and running server side code therefore can be a little overkill for what we want.
Project Setup - index.html
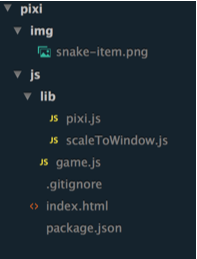
Above I have provided a screenshot which outlines the file structure for the project so use this as a guide to assist in the setup. You can obtain the pixi.js file from the Pixi website. I have opted to use the un-minified version throughout this tutorial as it's a little easier to debug with.
The project root is where we will put index.html file. This is just used as an entrypoint to the application and will load in all the javascript we will need.
The contents of this file are as follows:
<!DOCTYPE html>
<html>
	<head>
		<meta charset="utf-8">
		<meta http-equiv="X-UA-Compatible" content="IE=edge">
		<title>Playing with Pixi</title>
		<script src="js/lib/pixi.js"></script>
		<script src="js/lib/scaleToWindow.js"></script>
		<script src="js/game.js"></script>
	</head>
	<body>
	</body>
</html>
We are also using a script created by kittykatattack on github which we will use to ensure that the game is always centered on the screen. It's also great at preserving the aspect ratio.
Project Setup - game.js
Next, we need to create a game.js file inside the js folder. This file serves as the start point for our app and is the main entrypoint to the various functions and features of our game. Currently I am just using the one file and adding in code to it as I go along. Once this app becomes larger we may need to split the functionality around. For the purposes of this tutorial and what we are trying to achieve it's fine for now.
Initially we setup a renderer object which calls an autoDetectRenderer function within Pixi. This takes in a width and height (256 x 256).
From here we append the renderer view directly into the DOM using the appendChild function.
We define a stage object using Pixi's Container function.
Next we call the scaleToWindow library in to center the object on the page.
Finally render the stage object to show the object on the page and add an event listener to the rezie function which will call the scaleToWindow library on the renderer.
The contents of game.js is displayed below:
window.onload = function() {
	// Loads in a new render at a resolution of 1 with a few default options
	let renderer = PIXI.autoDetectRenderer(
		256, 256, { antialias: false, transparent: false, resolution: 4 }
	);
//Add the canvas to the HTML document
document.body.appendChild(renderer.view);

//Create a container object called the `stage`
let stage = new PIXI.Container();
let scale = scaleToWindow(renderer.view);

//Tell the `renderer` to `render` the `stage`
renderer.render(stage);

// Add an image to the loader
PIXI.loader
  .add("/img/snake-item.png")
  .load(setup);

// Rescales the window on resize and ensures
// everything is central
window.addEventListener("resize", event => {
	scaleToWindow(renderer.view);
});

// Setup function to run once load completed sucessfully
function setup() {
	// Load in image and assign it to a sprite
  	let sprite = new PIXI.Sprite.fromImage("/img/snake-item.png");

  	// Add the sprite to the stage
  	stage.addChild(sprite);

  	// Render the stage so we can see the sprite
  	renderer.render(stage);
}

}
Project Setup - snake-item.png
Finally just add the following png to your images folder with a name of "snake-item.png". This is just a small silver box which is used for demonstration at this point.
![]()
Conclusion and Wrap up
So, hopefully if you were following this closely, you should end up with the following result. At this point it doesn't seem like much and it seems like a fair amount of code to display an image.

Should there be any differences between the results of the project and what you have, all of the source code and images are available on github at the link below.
https://github.com/jaymeh/pixi-snake/tree/chapter-1
I am keen to continue diving into it more as we are barely scratching the surface. I can't wait to start adding in controls and actually getting some interactivity into this, which we will get onto in the next tutorial.
Until then, happy coding!
